Build a shopping cart with CakePHP and jQuery (part 2)
In this tutorial, we are going to implement functions for displaying products, adding product to shopping car as well as update shopping cart. At the end of this tutorial, a download link is provided for downloading the full source code.
Let us get started.
Download link of entire source code is provided at the end of this tutorial.
Display proudcts and view product's detail
In part 1, we have inserted some sample data to "products" table. Now let us build corresponding controller, model and view for "products" table.
Create model file "app/Model/Product.php" with code below:
<?php
App::uses('AppModel', 'Model');
class Product extends AppModel {

}
?>
"Product" class does not do anything specific; it is currently just a placeholder. In case you need to add additional features to this application, you may want to add more functions to this class.
Create model file "app/Controller/ProductsController.php" with code below:``
<?php
App::uses('AppController', 'Controller');

class ProductsController extends AppController {

    public function index() {
            $this->set('products', $this->Product->find('all'));
    }

    public function view($id) {
            if (!$this->Product->exists($id)) {
                    throw new NotFoundException(__('Invalid product'));
            }

            $product = $this->Product->read(null,$id);
            $this->set(compact('product'));
    }
}
?>
There are two functions in the controller class. Each of them serves a view of thier own.
- public function index(): This functions simply gets all products' data and set it to its corresponding view file.
- public function view(): This function finds a product's detail data and set it to its corresponding view file.
For each controller's action, we need a view file.
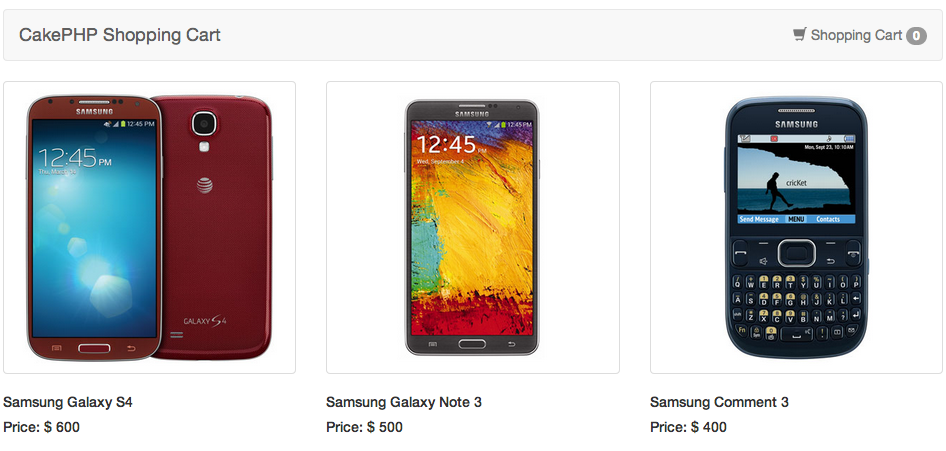
Create view file "app/View/Products/index.ctp" with code below, this is the view file for displaying all products.
<div class="row">
    <?php foreach ($products as $product):?>
    <div class="col-sm-6 col-md-4">
        <div class="">
            <?php echo $this->Html->link($this->Html->image($product['Product']['image']),
                    array('action'=>'view',$product['Product']['id']),
                    array('escape'=>false,'class'=>'thumbnail'));?>
            <div class="caption">
                <h5>
                    <?php echo $product['Product']['name'];?>
                </h5>
                <h5>
                    Price: $
                    <?php echo $product['Product']['price'];?>
                </h5>
            </div>
        </div>
    </div>
    <?php endforeach;?>
</div>
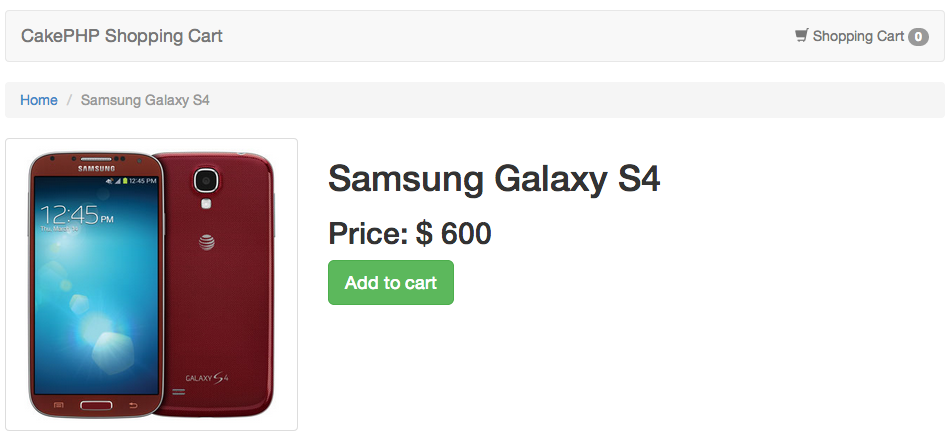
Create view file "app/View/Products/view.ctp" with code below, this is the view file for viewing a product's detail.
<div class="row">
    <div class="col-lg-12">
        <ol class="breadcrumb">
            <li><?php echo $this->Html->link('Home','/');?>
            </li>
            <li class="active"><?php echo $product['Product']['name'];?>
            </li>
        </ol>
    </div>
</div>

<div class="row">
    <div class="col-lg-4 col-md-4">
        <?php echo $this->Html->image($product['Product']['image'],array('class'=>'thumbnail'));?>
    </div>

    <div class="col-lg-8 col-md-8">
        <h1>
            <?php echo $product['Product']['name'];?>
        </h1>
        <h2>
            Price: $
            <?php echo $product['Product']['price'];?>
        </h2>
        <p>
            <?php echo $this->Form->create('Cart',array('id'=>'add-form','url'=>array('controller'=>'carts','action'=>'add')));?>
            <?php echo $this->Form->hidden('product_id',array('value'=>$product['Product']['id']))?>
            <?php echo $this->Form->submit('Add to cart',array('class'=>'btn-success btn btn-lg'));?>
            <?php echo $this->Form->end();?>
        </p>
    </div>
</div>
Now we have created the file views we needed for this section. However navigate to index page of the shopping cart. It still gives us the CakePHP's default page. What we want is that, the index page should display all products. Adding a routing rule to the Router can do this.
Open app/Config/routes.php, and add following line to the beginning of the file:
Router::connect('/', array('controller' => 'products', 'action' => 'index'));
This tells the shopping cart to show "products/index" page by default.
Now you should be see following page.
Clicking on the thumbnail image, it should show you below.
Add product to shopping cart
You should probably notice that, the "Add to cart" button is not yet working. That is what we are going to fix in this section.
Since we do not have a database table to store shopping cart's items. We are going to use Session. Let us create a powerful "Cart" model, which we will be using to represent the shopping cart. It is a model without database table.
<?php
App::uses('AppModel', 'Model');
App::uses('CakeSession', 'Model/Datasource');

class Cart extends AppModel {

    public $useTable = false;

    /*
     * add a product to cart
     */
    public function addProduct($productId) {
        $allProducts = $this->read();
        if (null!=$allProducts) {
            if (array_key_exists($productId, $allProducts)) {
                $allProducts[$productId]++;
            } else {
                $allProducts[$productId] = 1;
            }
        } else {
            $allProducts[$productId] = 1;
        }

        $this->saveProduct($allProducts);
    }

    /*
     * get total count of products
     */
    public function getCount() {
        $allProducts = $this->readProduct();

        if (count($allProducts)<1) {
            return 0;
        }

        $count = 0;
        foreach ($allProducts as $product) {
            $count=$count+$product;
        }

        return $count;
    }

    /*
     * save data to session
     */
    public function saveProduct($data) {
        return CakeSession::write('cart',$data);
    }

    /*
     * read cart data from session
     */
    public function readProduct() {
        return CakeSession::read('cart');
    }

}
Let us divide into this class.
Since this model class is not using any database table, we use "public $useTable = false;" to tell CakePHP not to look for its table.
We are going to store the shopping items into Session using structure as below:
array(
    product_id => number_of_items
    ...
)
Let us take a look at each function:
- public function addProduct($productId): it takes a $productId and add it to the shopping cart accordingly. It will either increase the item's counter or add a new item to the array.
- public function getCount(): it loop through the array and count number of products in cart.
- public function saveProduct(): a simple wrap function, it stores data to Session using "cart" as the key.
- public function readProduct(): it reads data from Session using "cart" as the key.
Okay, now we have built the "Cart" class. Let us get back to our task of adding product to cart.
Create controller file "app/Controller/CartsController.php" with code below:
<?php
App::uses('AppController', 'Controller');

class CartsController extends AppController {

    public $uses = array('Product','Cart');

    public function add() {
        $this->autoRender = false;
        if ($this->request->is('post')) {
            $this->Cart->addProduct($this->request->data['Cart']['product_id']);
        }
        echo $this->Cart->getCount();
    }
}
As you can see, public function addProduct() is the action for adding product to cart. This function does not require a view, because we are going to call this functio via ajax. All it does is to return a count of total products in the cart.
We turn off the view file by calling $this->autoRender = false;. And we use "Cart" class functions, which we built previously, to add product and get total products' count.
The last thing we need to do in this step is to add some JavaScript codes to the view.
Open file "app/View/Products/view.ctp", and following piece of JavaScript codes to the end of the file:
<script>
$(document).ready(function(){
    $('#add-form').submit(function(e){
        e.preventDefault();
        var tis = $(this);
        $.post(tis.attr('action'),tis.serialize(),function(data){
            $('#cart-counter').text(data);
        });
    });
});
</script>
This piece of JavaScript codes simply calls action "carts/add" and set the counter text correctly.
Now head back to your browser, and clicking "Add to cart" button in product detail page, it should dynamically set the counter on the top right corner correctly.
Update shopping cart
The final function we are going to implement is to update shopping cart items. However before that, we need to have a shopping cart page, which lists all current items in the cart.
First let us add a controller's action to CartsController class. Open file "app/Controller/CartsController" and add function below after function "add()":
public function view() {
    $carts = $this->Cart->readProduct();
    $products = array();
    if (null!=$carts) {
        foreach ($carts as $productId => $count) {
            $product = $this->Product->read(null,$productId);
            $product['Product']['count'] = $count;
            $products[]=$product;
        }
    }
    $this->set(compact('products'));
}
This function loops over items in the shopping cart and find their details.
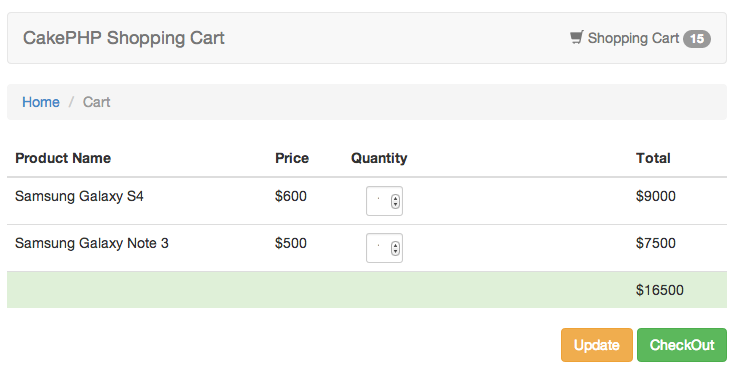
We need a view file for this action too. Create file "app/Carts/view.ctp" with code below:
<div class="row">
    <div class="col-lg-12">
        <ol class="breadcrumb">
            <li><?php echo $this->Html->link('Home','/');?>
            </li>
            <li class="active">Cart</li>
        </ol>
    </div>
</div>

<?php echo $this->Form->create('Cart',array('url'=>array('action'=>'update')));?>
<div class="row">
    <div class="col-lg-12">
        <table class="table">
            <thead>
                <tr>
                    <th>Product Name</th>
                    <th>Price</th>
                    <th>Quantity</th>
                    <th>Total</th>
                </tr>
            </thead>
            <tbody>
                <?php $total=0;?>
                <?php foreach ($products as $product):?>
                <tr>
                    <td><?php echo $product['Product']['name'];?></td>
                    <td>$<?php echo $product['Product']['price'];?>
                    </td>
                    <td><div class="col-xs-3">
                            <?php echo $this->Form->hidden('product_id.',array('value'=>$product['Product']['id']));?>
                            <?php echo $this->Form->input('count.',array('type'=>'number', 'label'=>false,
                                    'class'=>'form-control input-sm', 'value'=>$product['Product']['count']));?>
                        </div></td>
                    <td>$<?php echo $count*$product['Product']['price']; ?>
                    </td>
                </tr>
                <?php $total = $total + ($count*$product['Product']['price']);?>
                <?php endforeach;?>

                <tr class="success">
                    <td colspan=3></td>
                    <td>$<?php echo $total;?>
                    </td>
                </tr>
            </tbody>
        </table>

        <p class="text-right">
            <?php echo $this->Form->submit('Update',array('class'=>'btn btn-warning','div'=>false));?>
            <a class="btn btn-success"
                onclick="alert('Implement a payment module for buyer to make a payment.');">CheckOut</a>
        </p>

    </div>
</div>
<?php echo $this->Form->end();?>
This file looks big. But its main part is actually just the table. Rest is HTML structure for the design.
Now if you navigate to the shopping cart view page by clicking the cart icon on the top right corner. You should see:
Here comes the last part, open file "app/Controller/CartsController.php" and add following function after function "view()"
public function update() {
        if ($this->request->is('post')) {
            if (!empty($this->request->data)) {
                $cart = array();
                foreach ($this->request->data['Cart']['count'] as $index=>$count) {
                    if ($count>0) {
                        $productId = $this->request->data['Cart']['product_id'][$index];
                        $cart[$productId] = $count;
                    }
                }
                $this->Cart->saveProduct($cart);
            }
        }
        $this->redirect(array('action'=>'view'));
}
This function is triggered when you click "Update" button on shopping cart page. What it does is that, it loops over product count and add it to the Session. Please note if the product's count is less than 0, it is removed from Session, which means it is removed from shopping cart.
Wrap it up
It is almost done. There is only one thing we need to take care of here. If you recall. The top right corner counter is still a static value of 0. We need to modify that piece to reflect the real time items' count.
Open file "app/Controller/AppController.php" and add following function to it:
public function beforeFilter() {
    $this->loadModel('Cart');

    $this->set('count',$this->Cart->getCount());
}
This function will set the real time items' count to all the view files, which includes layout file. Hence open layout file "app/View/Layouts/default.ctp" and change the static value 0 to $count.
<?php echo $this->Html->link('<span class="glyphicon glyphicon-shopping-cart"></span> Shopping Cart <span class="badge" id="cart-counter">'.$count.'</span>',
            array('controller'=>'carts','action'=>'view'),array('escape'=>false));?>
Download
Now we should have a nice and fully working CakePHP powered shopping cart. You can download its full source code from link below:
The end
Hopefully this simple tutorial helped you with your development. If you like our post, please follow us on Twitter and help spread the word. We need your support to continue. If you have questions or find our mistakes in above tutorial, do leave a comment below to let us know.