PHPUnit Beginner Part 1: Get Started
This is part 1 of PHPUnit Beginner. In this tutorial we will explain why we should write unit tests to cover the codes we are writing and the power of PHPUnit. At the end, we will write a simple test using PHPUnit.
Types of tests
Before we dive into PHPUnit, let's understand different types of tests. Depends on how you want to categorize it, there are all kinds of tests in software development.
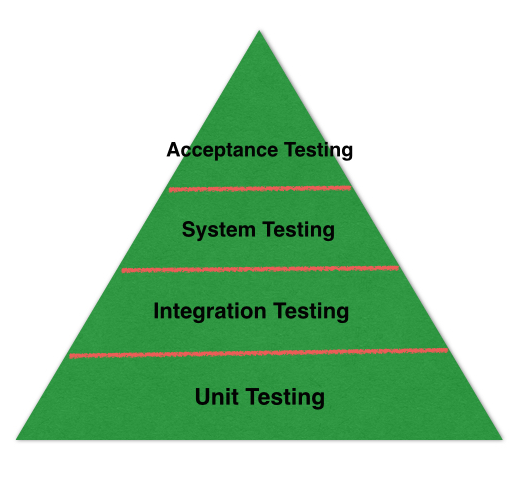
We would like to categorize tests based on the level of specificity of it. According to Wikipedia. There are generally four recognized levels of tests:
- Unit testing: It tests the smallest unit of functionality. From a developer's point of view, its focus is to make sure one function does what it is supposed to do. Thus it should have minimum or no dependence on other function/class. It should be done in memory, which means it should not connect to database, access the network or use the file system and so on. Unit testing should be as simple as possible.
- Integration testing: It combines units of codes and tests the combination works correctly. It is built on top of unit testing and it is able to catch bugs we could not spot by unit testing. Because integration testing checks if Class A works with Class B.
- System testing: It is created to simulate the real time scenarios in a simulated real life environment. It is built on top of integration testing. While integration testing ensure different parts of system work together. System testing ensures the whole system works as user expected before sending it to acceptance testing.
- Acceptance testing: When tests above are for developers at development stage. Acceptance tests are actually done by the users of the software. Users do not care about the internal details of the software. They only care how the software works.
If we put types of testing in a pyramid. It looks like as below:
What is PHPUnit
From the pyramid above, we can tell that, Unit testing is the building bricks of all other testing. When we build a strong base, we are able to build a solid application. However writing tests manually and running through them each time you make a change is tedious. What if there is a tool to automate the process for you, it will become absolutely more enjoyable to write tests.
This is where PHPUnit comes in. PHPUnit is currently the most popular PHP unit testing framework. Besides providing features such as mocking objects, it provides code coverage analysis, logging and tons of other powerful features.
Let's get it installed in our systems.
- Download: PHPUnit is distributed in a PHAR(PHP Archive) file, download it here.
- Add it to system $PATH: after downloading the PHAR file, make sure it is executable and add it to your system $PATH. So that you can run it anywhere.
Assuming you are on OSX machine. The process can be done in your terminal via commands below:
wget https://phar.phpunit.de/phpunit.phar
chmod +x phpunit.phar
sudo mv phpunit.phar /usr/local/bin/phpunit
If you have done everything right, you should be able to see PHPUnit version by typing command below in your terminal.
phpunit --version
Your first unit test
Time to create your first unit test! Before that, we need a class to test. Let's create a very simple class called Calculator. And write a test for it.
Create a file with the name of "Calculator.php" and copy the code below to the file. This Calculator class only has a Add function. :
<?php
class Calculator
{

    public function add($a, $b)
    {
        return $a + $b;
    }

}
Create the test file "CalculatorTest.php", and copy the code below to the file. We will explain each function in details.
<?php
require 'Calculator.php';

class CalculatorTests extends PHPUnit_Framework_TestCase
{
    private $calculator;

    protected function setUp()
    {
        $this->calculator = new Calculator();
    }

    protected function tearDown()
    {
        $this->calculator = NULL;
    }

    public function testAdd()
    {
        $result = $this->calculator->add(1, 2);
        $this->assertEquals(3, $result);
    }

}
- Line 2: include class file Calculator.php. This is the class that we are going to test against, so make sure you include it.
- Line 8: setUp() is called before each test runs. Keep in mind, it runs before each test, which means, if you have another test function. It will run setUp() before it too.
- Line 13: similar to setUp(), tearDown() is called after each test finishes.
- Line 18: testAdd() is the test function for add function. PHPUnit will recognize all functions prefixed with test as a test function and run it automatically. This function is actually very straightforward, we first call Calculator.add function to calculate the value of 1 plus 2. Then we check if it returns correct value by using PHPUnit function assertEquals.
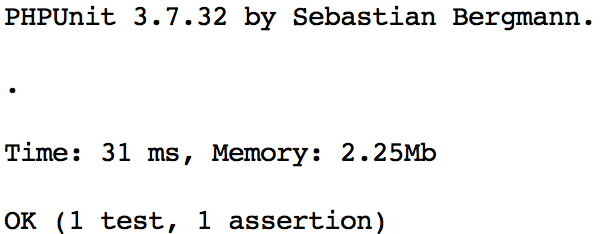
Last part of job is to run PHPUnit and make sure it passes all tests. Navigate to the folder where you have created the test file and run commands below from your terminal:
phpunit CalculatorTest.php
You should be able to see the successful message as below:
The end
We have completed the first tutorial of PHPUnit Beginner series. Next tutorial, we are going to show you how to use Data Provider in our tests.
Hopefully this simple tutorial helped you with your development. If you like our post, please follow us on Twitter and help spread the word. We need your support to continue. If you have questions or find our mistakes in above tutorial, do leave a comment below to let us know.