PHP File Upload Tutorial (part 2)
This is part 2 of PHP file upload series. You can find part 1 of this series at PHP File Upload Tutorial (part 1). In this tutorial, we are going to display uploaded files (images) on "index.php" and implement delete function. At the end of the tutorial, we also provide the downloadable source code.
Preparation
Make sure you have followed part 1 of this series, and implement the steps correctly. If you do, now you are free to move on to step 2.
Display image files
Currently if we open "index.php" file from browser, after uploading images files, there is no interface for us to see what images are uploaded. To overcome this issue, we will scan the "uploads" folder and display whatever images inside it on "index.php" file.
Open file "index.php" and copy the highlighted code to "index.php":
<!DOCTYPE html>
<html lang="en">
  <head>
    <meta charset="utf-8">
    <meta http-equiv="X-UA-Compatible" content="IE=edge">
    <title>PHP File Uploader</title>

    <!-- Bootstrap core CSS -->
    <link href="boostrap/css/bootstrap.min.css" rel="stylesheet">

  </head>

  <body>

    <!-- Static navbar -->
    <div class="navbar navbar-default navbar-static-top">
      <div class="container">
        <div class="navbar-header">
          <a class="navbar-brand" href="index.php">PHP File Uploader</a>
        </div>
      </div>
    </div>


    <div class="container">

        <div class="row">
           <?php
            //scan "uploads" folder and display them accordingly
           $folder = "uploads";
           $results = scandir('uploads');
           foreach ($results as $result) {
            if ($result === '.' or $result === '..') continue;

            if (is_file($folder . '/' . $result)) {
                echo '
                <div class="col-md-3">
                    <div class="thumbnail">
                        <img src="'.$folder . '/' . $result.'" alt="...">
                            <div class="caption">
                            <p><a href="remove.php?name='.$result.'" class="btn btn-danger btn-xs" role="button">Remove</a></p>
                        </div>
                    </div>
                </div>';
            }
           }
           ?>
        </div>


          <div class="row">
            <div class="col-lg-12">
               <form class="well" action="upload.php" method="post" enctype="multipart/form-data">
                  <div class="form-group">
                    <label for="file">Select a file to upload</label>
                    <input type="file" name="file">
                    <p class="help-block">Only jpg,jpeg,png and gif file with maximum size of 1 MB is allowed.</p>
                  </div>
                  <input type="submit" class="btn btn-lg btn-primary" value="Upload">
                </form>
            </div>
          </div>
    </div> <!-- /container -->

  </body>
</html>
Now let us take a close look at what we actually added to the file. First we use PHP function "scandir" to scan "uploads" folder. This function will return folder's content in an array format. So we loop through the returned array values, and if the value equals to "." or "..", we will ignore them. "." and ".." here stands for current directory and parent directory. Since they are not the actually folder's content we needed, we ignore them. At the end we use PHP "is_file" to make sure the image file exists and display them. Meanwhile, we add a remove link to each image. We will implement the delete function next step.
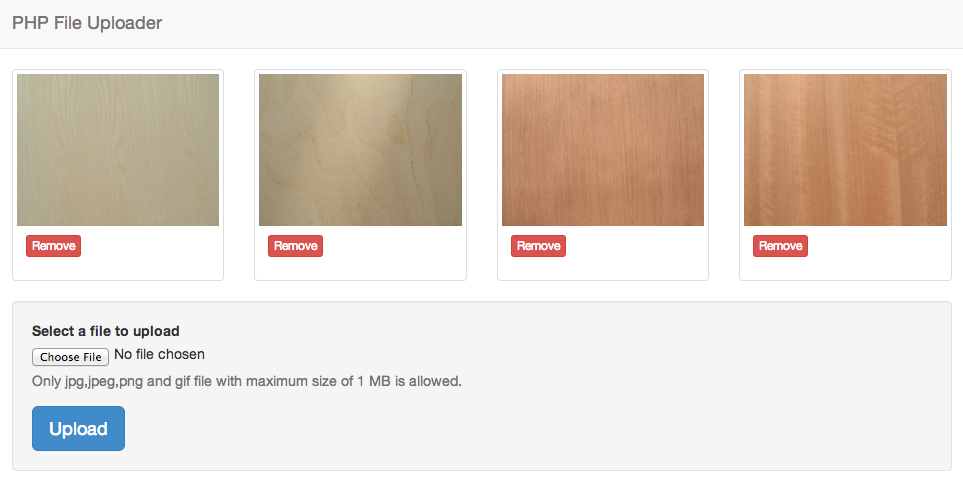
If you have implemented above correctly, you should be able to see your "index.php" page as below:
Implement delete function
If you have followed so far, we believe that you must have noticed the only missing function is to delete uploaded files. That is what we are going to implement in this step. Open the "remove.php" file, which we have created a while ago in part 1. And copy the code below to it.
<?php
// get correct file path
$fileName = $_GET['name'];
$filePath = 'uploads/'.$fileName;
// remove file if it exists
if ( file_exists($filePath) ) {
    unlink($filePath);
    header('Location:index.php');
}
?>
This file is simple and straightforward. First we get the file's name from URL using $_GET request. Then we check if the file exists, before we remove it using PHP function "unlink", at the end, we redirect page back to "index.php".
The end
If you have followed all steps correctly, you should now have a full working file uploader application. However please note that, this application is for beginners to understand the basics of how file uploading works in PHP. It is not yet a production ready application. There are lots of other aspects to cover, especially in security part. You can download the source code by the link below:
Hopefully this simple tutorial helped you with your development. If you like our post, please follow us on Twitter and help spread the word. We need your support to continue. If you have questions or find our mistakes in above tutorial, do leave a comment below to let us know.