PHP File Upload Tutorial (part 1)
Uploading file is a common feature in today's PHP applications. You will first have to understand the basics of file uploading in PHP, before you are able to use other fancy ajax file uploading libraries. In this series of tutorials, we will go through the basics of PHP file uploading. Once you understand the basics, you will be easily understand how client-side file uploading libraries works with PHP, such as DropzoneJs.
In this series of tutorials, we will use Twitter's Boostrap framework for the UI to build a simple file upload application. In this application, user is able to upload and delete files. At the end of the series, you should understand the basics of uploading file as well as removing file using PHP's functions and common mistakes people may make.
This is part 1 of the series. We are going to build a nice file upload form as well as implement uploading function.
Preparation
- Download Bootstrap framework from this URL. We are using version 3.0.1 by the time of writing this tutorial. Extract downloaded zip file and remove original CSS and JavaScript files, we only need to keep their minified version.
- Create a folder "uploads", this folder is for storing uploaded files. If you are working in a live linux server, you may want to change this folder's permission to 777. This is to make sure this folder is writable by PHP script.
- Create a file "index.php", it is the front page of our application.
- Create a file "upload.php", it is for uploading files to "uploads" folder.
- Create a file "remove.php", it is for removing files from "uploads" folder.
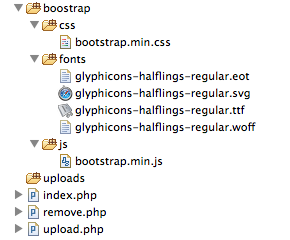
Your folder&file structure should look like this after the preparation:
Build upload form
Open file "index.php", and we are going to build a file form using Bootstrap. Copy below source code to "index.php":
<!DOCTYPE html>
<html lang="en">
  <head>
    <meta charset="utf-8">
    <meta http-equiv="X-UA-Compatible" content="IE=edge">
    <title>PHP File Uploader</title>

    <!-- Bootstrap core CSS -->
    <link href="boostrap/css/bootstrap.min.css" rel="stylesheet">

  </head>

  <body>

    <!-- Static navbar -->
    <div class="navbar navbar-default navbar-static-top">
      <div class="container">
        <div class="navbar-header">
          <a class="navbar-brand" href="index.php">PHP File Uploader</a>
        </div>
      </div>
    </div>


    <div class="container">

          <div class="row">
            <div class="col-lg-12">
               <form class="well" action="upload.php" method="post" enctype="multipart/form-data">
                  <div class="form-group">
                    <label for="file">Select a file to upload</label>
                    <input type="file" name="file">
                    <p class="help-block">Only jpg,jpeg,png and gif file with maximum size of 1 MB is allowed.</p>
                  </div>
                  <input type="submit" class="btn btn-lg btn-primary" value="Upload">
                </form>
            </div>
          </div>
    </div> <!-- /container -->

  </body>
</html>
In this simple file form, pay particular attention to the form's attribute "enctype", we set it to "multipart/form-data". This is probably one of the most common mistakes people make. When this attribute is missing, our backend PHP script will not be able to detect the file object. So please always rember to set form's "enctype" attribute to "multipart/form-data" when working with file.
In this application, we will also restrict the uploading files' extensions to jpg, jpeg, png or gif only. And maximum allow file size is 1 MB. This is to demonstrate how to perform file validation.
You may also notice the "action" attribute is pointed to "upload.php". That is where we are performing backend uploading process.
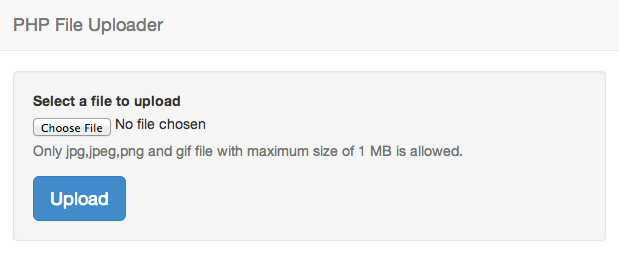
Now open "index.php" from your browser, and you should be able to see a similar form as below:
Implement upload function
Here comes the backend uploading process. We have created a file for handling this part at "upload.php". Open the file, and copy codes below to the file. It seems lots of code and complex, but do not worry, we will go through each section later.
<?php
        //turn on php error reporting
        error_reporting(E_ALL);
        ini_set('display_errors', 1);

        if ($_SERVER['REQUEST_METHOD'] == 'POST') {

            $name     = $_FILES['file']['name'];
            $tmpName  = $_FILES['file']['tmp_name'];
            $error    = $_FILES['file']['error'];
            $size     = $_FILES['file']['size'];
            $ext      = strtolower(pathinfo($name, PATHINFO_EXTENSION));

            switch ($error) {
                case UPLOAD_ERR_OK:
                    $valid = true;
                    //validate file extensions
                    if ( !in_array($ext, array('jpg','jpeg','png','gif')) ) {
                        $valid = false;
                        $response = 'Invalid file extension.';
                    }
                    //validate file size
                    if ( $size/1024/1024 > 2 ) {
                        $valid = false;
                        $response = 'File size is exceeding maximum allowed size.';
                    }
                    //upload file
                    if ($valid) {
                        $targetPath =  dirname( __FILE__ ) . DIRECTORY_SEPARATOR. 'uploads' . DIRECTORY_SEPARATOR. $name;
                        move_uploaded_file($tmpName,$targetPath);
                        header( 'Location: index.php' ) ;
                        exit;
                    }
                    break;
                case UPLOAD_ERR_INI_SIZE:
                    $response = 'The uploaded file exceeds the upload_max_filesize directive in php.ini.';
                    break;
                case UPLOAD_ERR_FORM_SIZE:
                    $response = 'The uploaded file exceeds the MAX_FILE_SIZE directive that was specified in the HTML form.';
                    break;
                case UPLOAD_ERR_PARTIAL:
                    $response = 'The uploaded file was only partially uploaded.';
                    break;
                case UPLOAD_ERR_NO_FILE:
                    $response = 'No file was uploaded.';
                    break;
                case UPLOAD_ERR_NO_TMP_DIR:
                    $response = 'Missing a temporary folder. Introduced in PHP 4.3.10 and PHP 5.0.3.';
                    break;
                case UPLOAD_ERR_CANT_WRITE:
                    $response = 'Failed to write file to disk. Introduced in PHP 5.1.0.';
                    break;
                case UPLOAD_ERR_EXTENSION:
                    $response = 'File upload stopped by extension. Introduced in PHP 5.2.0.';
                    break;
                default:
                    $response = 'Unknown error';
                break;
            }

            echo $response;
        }
        ?>
At the beginning of the file, we enable PHP to report any error. This is to prevent some errors being buried and cause us difficulty for debugging. Normally this should be turned off, so that the errors do not show on your live server. You will never want your website's visitors to view your server errors.
Next, we check if it is a POST request by inspecting "$_SERVER['REQUEST_METHOD']" value. If it is a GET request, that is when "upload.php" is opened directly, there will be no processing.
Then we create some varialbes to store file's information:
- $name: the uploaded file's name.
- $tmpName: uploaded file object stored in the temp directory. It will be copied to "uploads" directory we have created
- $error: error code during file uploading process. PHP returns corresponding error code during a file POST request. We use this as a flag to determine if the file is successfully posted from client machine to the server.
- $size: the size in bytes of the uploaded file.
- $ext: the extension of the uploaded file.
Next step. We use the flag "$error" to check if there is any error happened during the upload process. There are numbers of possible errors, such as file was partially posted, server has restricted maximum post file size and so on. You can check the "$response" string to get a better idea of the error. When configured properly, these errors can be eliminated. If you do run into any of those errors, check out this tutorial to fix them.
When there is no upload error, that is when "$error" equals to "UPLOAD_ERR_OK" in the switch statement. We are going to perform our own validation rules as well as moving the successfully uploaded file to "uploads" folder we have created initially. The logic here is actually pretty straightforward. First we check if the "$ext" is falling into any of pre-defined extensions. Then we check if the "$size" is less than 2 MB. Pay attention, since the "$size" is in bytes, we need to divided it by 1024x1024 to get the correct megabyte value. Lastly, we move the temporary object to "uploads" folder. That is done by PHP function move_upload_file.
If you just get started, you need to understand the concept of uploading file in PHP. File is first posted to the server via the form and store in a temporary place in server. You then need to move that temporary object to your defined directory.
The end
Now we have completed implementation of uploading file. Now you should be able to use the uploader to upload files to "uploads" folder
In part 2 of this series, we will first enable the uploaded files to show on "index.php" page and implement delete function. And of course, source code will be available for downloading in part 2.
Hopefully this simple tutorial helped you with your development. If you like our post, please follow us on Twitter and help spread the word. We need your support to continue. If you have questions or find our mistakes in above tutorial, do leave a comment below to let us know.