Build an image gallery with Pikachoose and PHP
Pikachoose is a lightweight jQuery image plugin, it comes with easy to use API and simple design. In this tutorial, we are building a dynamic jQuery image gallery. Which means users will upload images dynamically from a script and the front page will automatically show an image powered by Pikachoose. However there is no database required, images are scanned from a particular folder. Let us get started.
Preparation
- Download Pikachoose from this URL. We are using version 4.5.0 by the time of writing this tutorial. Extract "lib" and "styles" folder from downloaded zip file. And in this tutorial we are using the "bottom.css" for stylesheet.
- Create a folder "uploads", this is for storing uploaded files.
- Create a file "index.php", this is for the gallery's page.
- Create a file "upload.php", this is for uploading images to "uploads" folder.
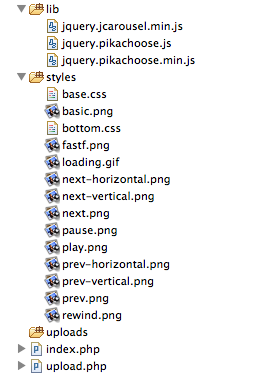
Your folder&file structure should look like this after the preparation:
Building the upload page
Open file "upload.php" and copy content below:
<?php
$ds          = DIRECTORY_SEPARATOR;

$storeFolder = 'uploads';

if (!empty($_FILES)) {

    $tempFile = $_FILES['file']['tmp_name'];

    $targetPath = dirname( __FILE__ ) . $ds. $storeFolder . $ds;

    $targetFile =  $targetPath. $_FILES['file']['name'];

    move_uploaded_file($tempFile,$targetFile);

}
?>

<!DOCTYPE>

<html>

<head>

    <style>
        body
        {
            font-family: Arial, Helvetica, 'Liberation Sans', FreeSans, sans-serif;
            font-size: 12px;

        }
        div
        {
            margin:auto;
            width:400px;
            border:1px solid #DDD;
            padding: 10px;
        }
        form input
        {
            margin-bottom: 10px;
        }
    </style>

</head>

<body>

    <div class="content">

        <h3>Upload file below and it will appear on front page</h3>

        <form action="upload.php" enctype=multipart/form-data method="POST">
            <input name="file" type="file"/>
            <br/>
            <input type="submit" value="Upload">
        </form>

    </div>

</body>
</html>
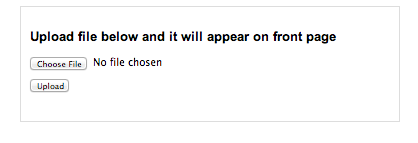
This is a very simple upload page, what it basically does is to upload your chosen files to folder "uploads" folder. For tutorial purpose, we made it simple and insecure, because everyone will be able to come to this page and upload files. To make it production ready, you should put "upload.php" to your password protected admin section.
The part, which handles the uploading work is the PHP block at the beginning of the script. It firstly checks if there is any file sent and then move it to "uploads" folder.
The upload page should look like below after you have completed this section. And you should be able to upload files to "uploads" via the form.
Building the upload page
Open file "index.php" and copy content below. We will go though the codes after.
<!DOCTYPE>
<html>
    <head>
        <!----- block 1 ------>
        <link type="text/css" href="styles/bottom.css" rel="stylesheet" />
        <script type="text/javascript" src="https://ajax.googleapis.com/ajax/libs/jquery/1.9.1/jquery.js"></script>
        <script type="text/javascript" src="lib/jquery.jcarousel.min.js"></script>
        <script type="text/javascript" src="lib/jquery.pikachoose.min.js"></script>
        <script language="javascript">
            $(document).ready(function (){
                    $("#pikame").PikaChoose({showCaption:false});
            });
        </script>
        <!---- end of block 1 ------>
</head>

<body>

<div class="pikachoose">
    Pikachoose Gallery

    <!----- block 2 ------>
    <ul id="pikame" >
        <?php
        $path = 'uploads';

        $files  = scandir($path);

        // code snippet
        foreach ( $files as $file ) {
            if ( '.'!==$file && '..'!==$file ) {
                if ( file_exists($path.DIRECTORY_SEPARATOR.$file) ) {
                    echo
                    '<li><img src="'.$path.'/'.$file.'"/></li>';
                }
            }
        }
        ?>
    </ul>
    <!---- end of block 2 ------>
</div>

</body>
</html>
-
block 1: Firstly let us take a look at the first block of code. It is simply include required JavaScript libraries and Stylesheet files.
And at last creating a Pikachoose object by calling:
$(``"#pikame"``).PikaChoose({showCaption:``false``}); -
block 2: This part of code is a bit tricky. It scans folder "uploads" by using function scandir. Please note scandir will return '.' and '..' as results, that is why we need to filter them out in the loop. Lastly we used DIRECTORY_SEPARATOR as path separator, so that it works both on Windows and Linux systems.
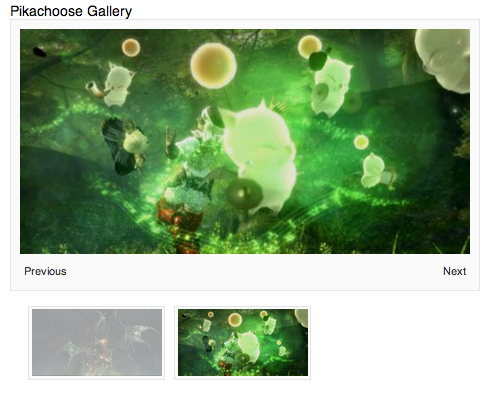
After this section, you should be able to view images uploaded from section 2, from a pretty Pikachoose gallery.
The end
Hopefully this simple tutorial helped you with your development. If you like our post, please follow us on Twitter and help spread the word. We need your support to continue. If you have questions or find our mistakes in above tutorial, do leave a comment below to let us know.